Dithering
This is a short article on how to easily dither images if you’re looking for nice retro aesthetics using simple Unix commandline tools. I won’t cover the technical aspects in detail — if you’re interested in them there’s a great article on surma.dev.
Dithering is a set of techniques for adding noise to images which have had their colour palettes reduced. The main reason to do this is that it allows you to reduce the size of an image considerably while still preserving a decent amount of detail. Often, people also do this for retro aesthetics. Two great examples are the wonderful Return of the Obra Dinn by Lucas Pope, and the website ritualdust.com.
How to do it
The easiest way I’ve found to perform the actual dithering is using “didder”, a commandline tool by makeworld. It supports many types of dithering and accepts various helpful parameters. However, it can only accept and output PNG and GIF images, so if you have e.g. JPEG images you will unfortunately have to make them into PNGs.
The installation process simply involves downloading a binary from the
releases page, copying it somewhere in your $PATH
(e.g. /usr/local/bin), and marking it as executable (i.e. with chmod +x /usr/local/bin/didder). You should then be
able to use the didder command.
I’m going to go over some basic options that get good-looking results. If you want to understand the options in more detail, read the didder manpage.
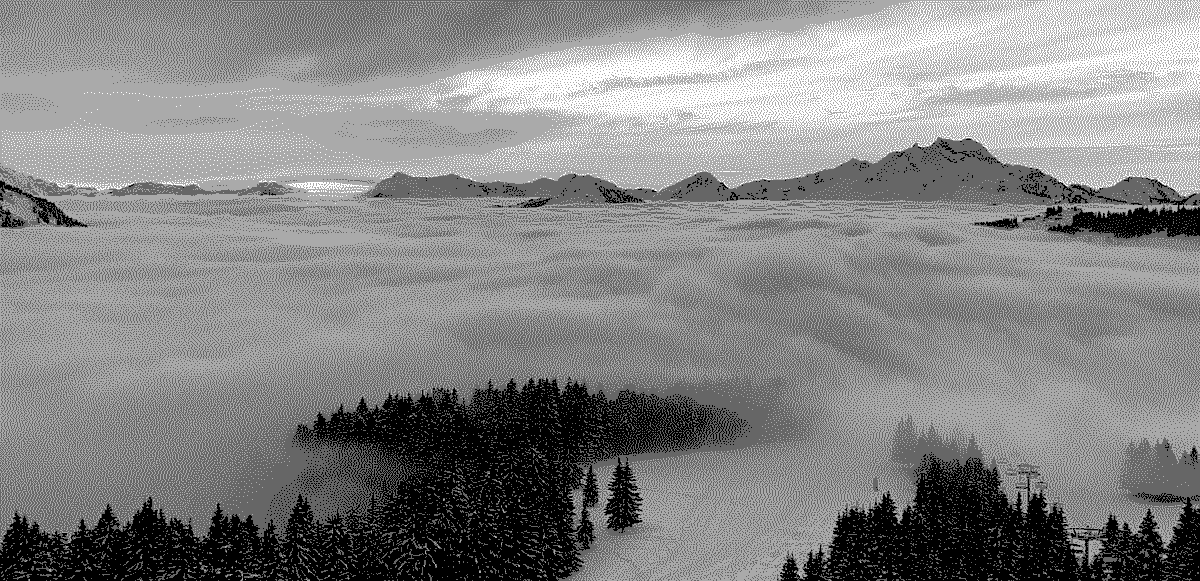
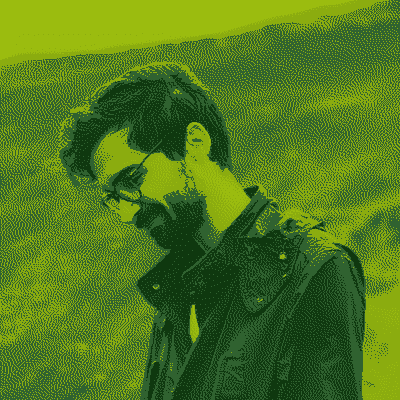
Just for reference, this is the image we’ll be using for testing:

Old-school dithering
The simplest and most retro-looking form of dithering uses an ordered dithering matrix, which specifies a matrix of offsets which will gently nudge each pixel into varying colours of our palette. This is the kind of dithering that was used on the Game Boy. To achieve this with didder, we can run the following command:
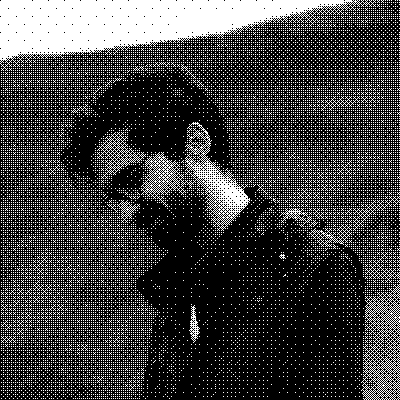
didder -i example.png -o example_bayer16.png -p 'black white' bayer 16x16
Let’s break down the arguments. -i example.png represents our input image. -o example_bayer16.png is our output
image. -p 'black white' defines our dithering palette. Remember, dithering involves reducing the image’s colour palette
to a small number of colours. In this case, we will nudge all of the image’s colours into either black or white.
Lastly, bayer 16x16 represents the algorithm we’re going to use, which is ordered dithering based on a 16x16 Bayer
matrix. This dithering algorithm creates visible patterns in the output, and the size of the matrix will affect these
patterns. You can compare this with the result of using bayer 8x8:

didder -i example.png -o example_bayer8.png -p 'black white' bayer 8x8
You can also use the --strength option to adjust the strength of the dithering. Broadly speaking, you’ll perceive this
as affecting the contrast of the image. A value of 1.0 is the default, so you can try to add or subtract a little bit
from that if the contrast of your image isn’t looking quite right.

didder -i example.png -o example_bayer16_strength1.1.png -p 'black white' --strength 1.1 bayer 16x16
Super old-school dithering
If you’d like to go extra old-school, you can downscale the image before dithering, and upscale it afterwards. This gives you a pixelated look, as you would expect.

didder -i example.png -o example_bayer16_2x.png -p 'black white' --height 200 --upscale 2 bayer 16x16
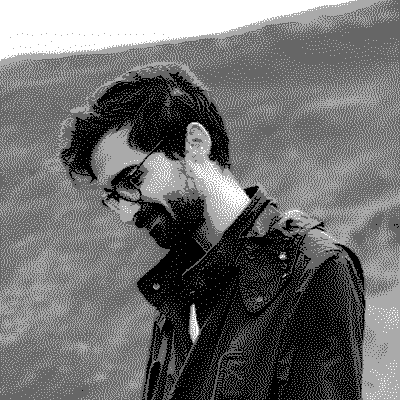
Nicer-looking dithering
If you’d rather like your images to look more high-quality, an error diffusion matrix method will give better results, at least in my experience. This method works by checking how far it had to nudge the colour of every pixel, and then distributing this error to surrounding pixels. I’ve chosen the Sierra error diffusion matrix, but didder has a bunch of different matrices you’re free to play around with.

didder -i example.png -o example_sierra.png -p 'black white' edm sierra
There is also an -s option you can specify to use “serpentine dithering”, which will wiggle the position of the
dithering a bit when going up and down the image. This should reduce patterning, but on my image it didn’t seem to make a
huge difference.

didder -i example.png -o example_sierra.png -p 'black white' edm -s sierra
As before, you can try the upscaling method to make things a bit more retro and pixelated.

didder -i example.png -o example_sierra_2x_strength1.1.png -p 'black white' --strength 1.1 --height 200 --upscale 2 edm sierra
Colour palettes
So far, our images have only been black and white. It’s possible to specify a larger colour palette, which increases the amount of detail in the image by a lot. To start off with, we’re going to keep the image greyscale, but specify two additional shades of grey in between black and white.
didder -i example.png -o example_sierra_4shade.png -p 'black 666666 aaaaaa white' edm -s sierra
Of course, a lot of the aesthetic value comes from adding a little bit of colour in there. The way this works is that you dither the image just as before, but you recolour each colour in your greyscale palette, by converting it into an arbitrary RGB colour. Here, we’ve palette-swapped the previous image into a blue palette.
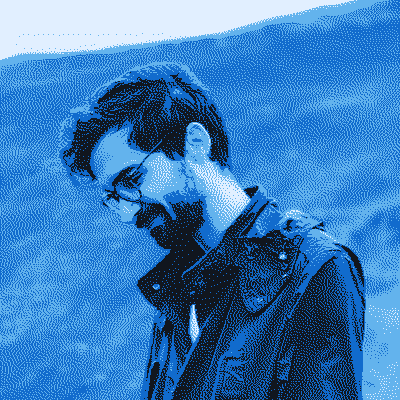
didder -i example.png -o example_sierra_recolor.png -p 'black #555555 #aaaaaa white' -r '11161e 116bcd 63b3ed e1efff' edm sierra
You can choose any colours you like. Here’s an example with a palette based on the original Game Boy colours.
didder -i example.png -o example_sierra_recolor_gb.png -p 'black #555555 #aaaaaa white' -r '0f380f 306230 8bac0f 9bbc0f' edm sierra
At this point, we can try the original Bayer matrix algorithm, just to see what it looks like.
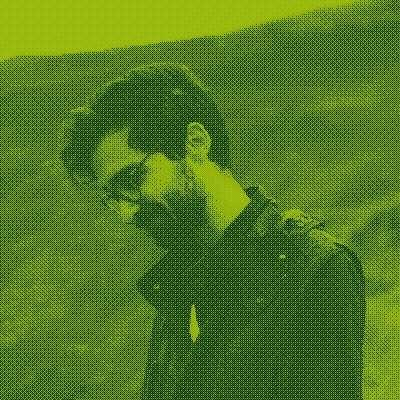
didder -i example.png -o example_bayer_recolor_gb.png -p 'black #555555 #aaaaaa white' -r '0f380f 306230 8bac0f 9bbc0f' --strength 0.7 bayer 16x16
One last thing I’d like to mention is that all this dithering we’ve been doing has obviously reduced our image size by
quite a lot, which is really neat. Our original example.png was 197K, while the black-and-white Sierra version is 23K,
and our Game Boy palette Sierra version is 44K. This is all with lossless compression, too. I’m sure file size could be
reduced even further, since I wasn’t paying close attention to it while doing these tests.
I encourage you to experiment with the options and to read the article and manpage I linked above in more detail, since the technical details behind dithering are pretty interesting. Send me your results! :)